
We are continuing to do more blocks from the “One Hundred and one Patchwork Patterns” book by Ruby Short McKim. The book was published in 1931, and my husband’s maternal Grandmother learned to quilt from this book. These blocks are done in her honor.
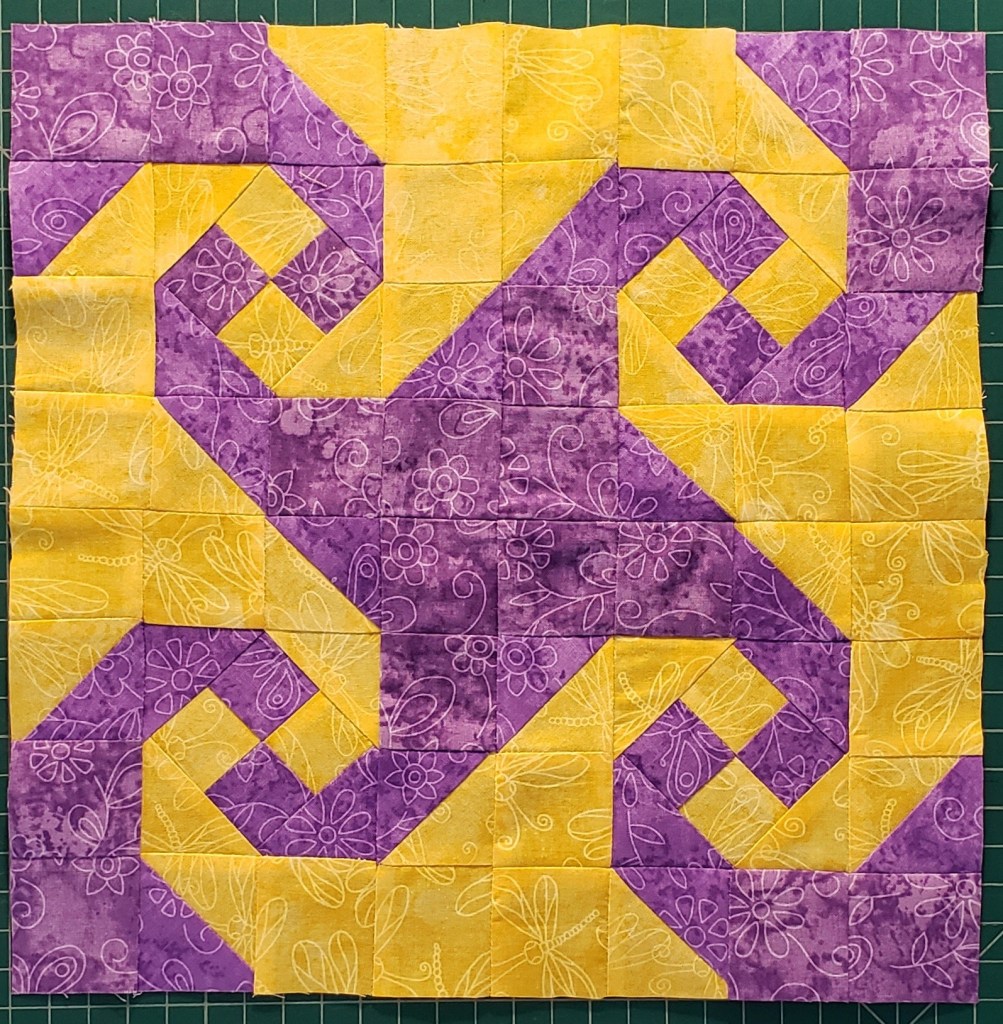
This is the 27th block for 2020, the Snails Tail or Monkey Wrench block.
From the original Instructions ” THIS stunning quilt is one of the best examples of how an exceedingly simple block may be set together into an intricate pattern. Pieced blocks of squares and triangles cut from the given patterns and pieced as shown, alternate with 10-inch plain blocks, dark in one row and light in another. It really isn’t hard to do, although each “monkey wrench” must be turned at a certain angle, one way in the row with large light squares and a turn further around in the next row with dark alternate squares. ” (McKim)
The original block finished at 10″ x 10″, we will continue with our block 12 1/2″ x 12 1/2″ unfinished (12″ x 12″ finished). We have modified the block to make it easier to make without creating templates.

We are giving you two options for making this block, you can make a single block, or create four smaller 6 1/2″ x 6 1/2″ blocks to create a different pattern. Instructions for this layout are after the simpler block.
Fabric Requirements
Background (yellow) – 18″ x 18″
Color (purple) – 18″ x 18″
Fabric Cutting
Larger pieces (single block)

Smaller pieces (four small blocks) – two color

Assembly – Large pieces
There is the option to do the larger pieces, or to use smaller pieces and repeat the block 4 times. The instructions for the smaller pieces will be after the Large block, for the most part, the instructions are the same for both blocks, except that you will need to repeat the smaller pieces 4 times to get the four sections for the block.

Step 1 – Using Piece 3 of both colors, cut diagonally in half.
Step 2 – Making HST
Using one piece of Piece 4 ( 5 5/8″ x 5 5/8″) of both colors.
Place front sides together
Stitch 1/4″ along all four sides of square (red line is stitching)

Cut Diagonally from Corner to corner both directions

Square up using your preferred method to 3 1/2″ x 3 1/2″. You will have 4 HST.
Step 3 – Four patches
Using the both Pieces 2 (long strips), and sew together the long sides.
Sew Piece 2 strips of Purple and yellow together.

Press seams to the darker fabric.
Cut the strip into sections (for the smaller block, you will cut into two sections each 2 5/8″ wide, by 4 3/4″

Using the two pieces rotate one piece so that the purple and yellow are together, while making sure that the same fabric do not match.

Sew 1/4″ seam and press seams.

Square up the squares to 5 1/4″ x 5 1/4″
Step 4 – Square in Square
Using the 4-patch that you made in the last step using the Piece 3 triangles, arrange around the 4-patch in the following layout.
See picture, make sure that the purple triangle has the purple square to the right square. (See picture).

Add a triangle to one side, match the center of the triangle, by folding in half. Match to the center of the 4-patch.
Press, then add the opposite color to the next side, then continue around the 4-patch alternating colors.


Square-up the square to 6 1/2″ x 6 1/2″
Step 5 – Layout the pieces for the block.

Sew the first and last columns together.
Sew the middle two rows together, by sewing the middle two pieces, and the bottom two pieces, then sew to the middle Square-in-square.
Then sew the three columns together.

Press the seams. You have now completed the Large Snails Tail/Monkey Wrench.

Assembly directions for smaller pieces.
Step 1 – Using Piece 3 of both colors, cut diagonally in half.

Step 2 – Making HST
Using one piece of Piece 4 ( 4″ x 4″) of both colors.
Place front sides together
Stitch 1/4″ along all four sides of square (red line is stitching)

Cut Diagonally from Corner to corner both directions

Square up using your preferred method to 2″ x 2″ HST.
You will repeat this step 3 more times for a total of 16 HSTs.
Step 3 – Four patches
Using the both Pieces 2 (long strips), and sew together the long sides.
Sew Piece 2 strips of Purple and yellow together.

Press seams to the darker fabric.
Cut the strip into sections each 1 1/2″ wide, by 2 1/2″, for a total of 8 sections

Using the two pieces rotate one piece so that the purple and yellow are together, while making sure that the same fabric do not match.

Sew 1/4″ seam and press seams. You should have a total of 4 of the blocks

Square up the squares to 2 1/2″ x 2 1/2″
Step 4 – Square-in-square
Using the 4-patch that you made in the last step using the Piece 3 triangles, arrange around the 4-patch in the following layout. Make sure that the purple triangle is matched to the block with the purple square to the right of the triangle, see the layout below.

Add a triangle to one side, match the center of the triangle, by folding in half. Match to the center of the 4-patch.
Press, then add the opposite color to the next side, then continue around the 4-patch alternating colors.

Square-up the square to 3 1/2″ x 3 1/2″

Step 5 – Assembly
Following Step 5 for the small block to make the four sections of the block. Square each to 6 1/2″ x 6 1/2″
Step 6 – Final Assembly

Layout the 4 blocks, and rotate each ¼ turn to bring the center Color A together. Then sew the 4-patch together.
Press the seams, and you have now completed the 4-patch of the Snails Tail/Monkey Wrench block.
I look forward to seeing all your wonderful blocks! Make sure to post on the Facebook group! Remember to add the hashtag #BomSnailsTail
Thank you for joining us for this November 2020 block of the month!
Click Here for a downloadable PDF of the instructions.
For the previous blocks, you can check under “Units” in the Facebook group.
Other color options for the blocks.
Two colors

Four Colors

Here is how it may look as a full quilt of the blocks.


1 Comment