
You can use the additional 9 blocks from 2020 to create a quilt top, or using some of the other blocks from 2020, to create a larger quilt top. In my example, I used some of the original 20 blocks, and some of the extra blocks to create this quilt top. To create this size you need 18 blocks. Each block is 12 ½” x 12 ½” unfinished.
Fabric Cuttings

Cut all Pieces 3 (18 1/4″ x 18 1/4″) white pieces diagonally in half both ways (red lines), creating 4 triangles for each piece. You will only need 10 of these, so you will have two extra.

Cut all Piece 4 ( 9 1/2″ x 9 1/2″) white pieces diagonally in half once (red line)

Assembly
The quilt top is put together in strips diagonally. You can decide where you want to start, and usually the best is to pick one of the longest strips. I started my first row as the “Main Strip” row, working to the right and then towards the borrow left. You will have a total of 6 rows. Two rows of 5 blocks, two rows of 3 blocks, and two rows of 1 block.

Step one.
Sew one 2 1/2″ x 2 1/2″ white square to each end of a 2 1/2″ x 12 1/2″ black strip. You need to make 14 of these sets. (White/black/white)

Sew 2 1/2″ x 2 1/2″ white square to one end of 2 1/2″ x 12 1/2″ black strip. You will need three of these. (White/Black)

Step two
Starting with the first block of your main row, sew a 2 1/2″ x 12 1/2″ back strip to one side of the square.
Then sew one of the strips with a white square (White/black) to the the next side of the square, matching the white square to the black, then add another black/white strip one to the next side, and and finish by sewing a black stip with two white ends (White/black/white) to the last side of the block.
Your first block should look like this.

The rest of your blocks for this row.
You will add a black strip to opposite sides of the block.

Then add the one strip with the 2 white squares to the block.

Then you will add the block to the bottom of the first block,

Repeat adding the two black strips and one white/black/white strip to each block for this main row. Then continue adding all the blocks for the main strip.
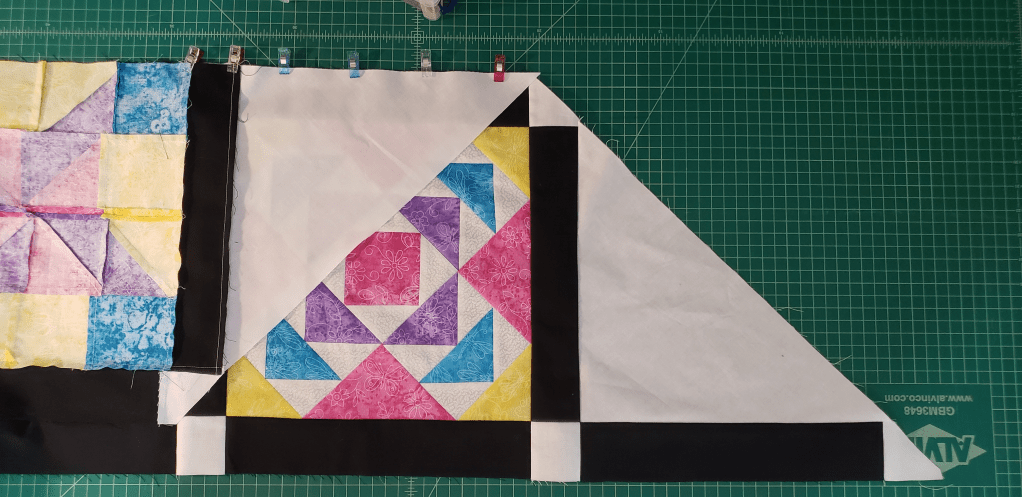
Once you have added all blocks to the first row, (Main row) you will add one of the Piece 4 (smaller triangles) to the top of the block. (This will be the block that you want to the far left). Matching the longer side to the black strip. This is the corner to your quilt top.
Do not worry if the white squares stick out at the end, you will trim these squares when you square-up your quilt top.
Next, you will sew a black strip with one white block to the left side of piece 3 triangle. This will go at the bottom of the row. The 2 1/2″ x 2 1/2″ square will stick out, this is normal.
After pressing your seams, you will need to trim the corner. Using a ruler, line up the ruler and trim the corner.

Your triangle should look like this after trimming.

Sew the triangle and strip to the last block in the row. (This will be the block to the right in the row).

You have completed the first diagonal strip of the quilt.
Step 3 – Creating the row to the right of the main strip (above the row)
On the first and third blocks you will add 2 strips to the top and bottom of the block, and a strip with the white squares at both ends to the outside of the block.

The middle block will just have one black strip on the block. Press this strip towards the block, so it will nest with the other blocks.

NOTE; Make sure if you block has a right side up, that you watch which side of the square you add the strips.
After adding the strips, sew the three blocks together.
Then add a Piece 3 to the top Making sure that you match the side with the side of the blocks without a black strip. (See picture)

Note, Piece 3 will not go all the way to the end of the 2 ½” square, as you will trim the 2 ½” square into a triangle, make sure that the bottom is flat along with the triangle, as in the picture above.
And the bottom of the row. The Piece 3 will be the opposite direction, again, matching the side of the triangle with the side of the block without a black strip. (see picture)

After sewing the triangles to the ends, trim the corner, by matching a ruler with the long edge of the triangle, and trimming. You will have a little off shaped triangle, which includes the seam allowance.

Attach the row to the Main row, on the right side of the strip. Match up the black strips with the white squares.

Again, the end will not match 100%, as you will trim the corner of the 2 1/2″ square.
Press the seams, you will see the white triangle ends will be a straight line.
You now have two strips of the quilt top completed.
Step 4 – Far right strip – one block
Add one strip to the top and bottom of the far right strip, and then add a strip with the white squares to the right side of the block.

Then add a Piece 4 (smaller triangle) to the top of the block, and a Piece 3 to the top and bottom sides of the block. See in picture that Piece 4 (smaller triangle) does not go all the way to the ends, again, you will trim the 2 ½” squares, just sew all the way to the end of the triangles point.

Sew Piece 4, press open.

Sew Piece 3 to each side, and then press open.

You will attach this row to the previous row added in step 3. You can trim off the extra on the 2 ½” squares now, or you can wait until after the top has been assembled, and trim the 2 ½” squares.
Not this will be your top right corner of the quilt top (piece 4).
This will complete the top part of your quilt top. Now to add the length of the quilt top.

Step 5 – Long strip to left of Main Row (or below)
You will complete this strip similar to the one is Step 3, by alternating adding three strips to every other block, with alternating only one strip to the second, and forth blocks. They will be the opposite direction, with the right side without a black strip.
Before adding the triangles to the ends, you will do them opposite of the main row, step 2. With a large triangle (18 1/4″) on the top of the strip (left side), and a small triangle (9 1/2″) on the bottom (right side).

You will continue to add one more rows, reducing the number of blocks to 3 for the row.
The final block you will create the same as you did in Step 4, adding black strips on the opposite side, and one white/black/white strip to the bottom row.
Then add two Piece 3 to each side of the block, then add Piece 4 (small triangle) to the bottom of square.

Sew to the last row (3 blocks).
Now to square-up your quilt. You will need to layout the quilt, and then trim all the 2 ½” squares that stick out of the quilt. So that you have a rectangle quilt top.
Final step
You have completed the quilt top, you can add a single 2 ½” strip along the outside edges of the quilt top and then quilt and bind. Or you could add an additional wider strip afterwards. Depends on the size you want your quilt to finish at.
Here is my quilt top before I added the 2 ½” strip around the outside.

I look forward to seeing your completed quilt tops, please post in the Facebook group for us to all enjoy.
If you have any questions, on the instructions, please feel free to post a question in the group, or send me a private message in Facebook.
Click here for a PDF version of the instructions.
Here is a layout if you wanted to use 8 of the 9 blocks.

