Instructions for adding sashing between the blocks.

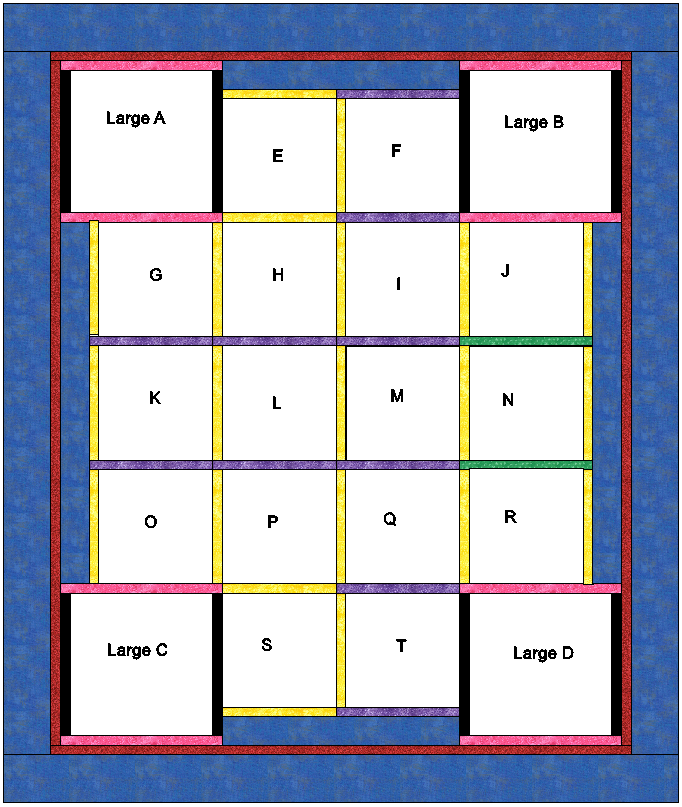
This is the layout I finally chose for my quilt top – 71″ x 84″. The placement of the blocks are completely up to you, but the four corners are the larger 15″ x 15″ finished blocks. Otherwise, you can place any direction you want.
I tried several different layouts to see what I like best, and this was the one that I liked the best. This is only one layout, but I wanted you to have an option, and you can change as you decide. The strips can be moved towards the center instead of on the edges.
There are a couple options to make the quilt larger if you want.
- Make the black sashing strips wider (currently 1″ finished)
- Make the red border strip wider (currently 1″ finished)
- Make the blue border wider (currently 5″ finished)

NOTE: You can precut the strips into the correct lengths or use strips and cut after sewing. Instructions are for precut strips.
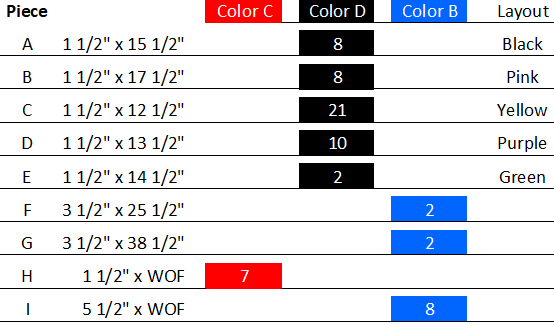
Fabric Cutting
You will need around 20 strips at 1 1/2″ for a 1″ sashing.
Layout

Assembly
Using the layout above, to see which blocks you are to use.
Step 1 – Sew “Black” strips, (15 1/2″) to the sides of the four large blocks
Step 2 – Sew the “Pink” strips, (17 1/2″) to the top/bottom of the four large blocks
Step 3 – Sew “Yellow” strips, (12 1/2″) to the left side of the following blocks
- F, G, H, I, J, K, L, M, N, O, P, Q, R, T
Step 4 – Sew “yellow” strips, (12 1/2″) to the right side of the following blocks
- J, N, R
Step 5 – Sew “yellow” strips ( 12 1/2″) to the top and bottom of the following blocks
- E, S
Step 6 – Sew “Purple” strip (13 1/2″) to the top and bottom of the following blocks
- F, T
Step 7 – Sew “Purple strips (13 1/2”) to the bottom of the following blocks
- G, H, I, K, L, M
Step 8 – Sew “Green” strips (14 1/2″) to the bottom of the following blocks
- J, N
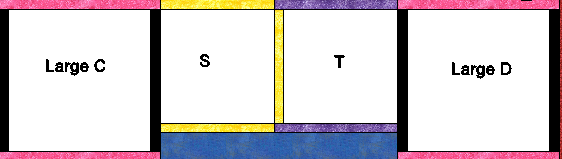
Step 9 – Top row
- Sew Blocks E & F together
- Sew a filler strip (3 1/2″ x 25 1/2″) to the top of pieces E/F
- Layout in the following layout, and sew pieces together using pieces A, B and E/F

- Sew blocks together – press seams.
Best Practice is to watch how you press your seams, as this will make a difference when you add each row.
Step 10 – Bottom Row
- Sew Blocks S & T together
- Sew a filler strip (3 1/2″ x 25 1/2″) to the bottom of pieces S/T
- Layout in the following layout, and sew pieces together using pieces C, D, S/T
- Sew the blocks together – press seams.
Step 11 – Middle Rows
- Sew blocks G, H, I & J together in the following layout

- Sew blocks K, L, M & N together in the following layout

- Sew blocks O, P, Q & R together in the following layout

- Sew the three rows together press seams
Side strips

- Sew a filler strip (3 1/2″ x 38 1/2″) to the left side of blocks G, K, O
- Sew a filter strip (3 1/2″ x 38 1/2″) to the right side of blocks J, N, R
Step 12 – Rows together
- Using Top row (step 9), Middle rows (step 11) and Bottom row (Step 10)
- Sew the rows together

Step 13 – 1 1/2″ strip
- Using strip sew to the left and Right side of the bocks
- Press seams
- Using strip sew to the top and bottom of the blocks

Step 14 – Final Assembly
- Add a 5 1/2″ strip to the left/right sides of the blocks
- Then add to the top and bottom of the blocks.
Press the seams.
You have now completed the quilt top for the 2021 Quilting BOM blocks. 71″ x 84″
Here is my Quilt top all quilted and bound.
I look forward to seeing all your wonderful quilt tops! Make sure to post on the Facebook group! Remember to add the hashtag #QuiltingBOM2021
Click Here for a PDF of the instructions (Blogs part 1 & part 2)
Stay tuned for new blocks to come in 2022!
