The first challenge for 2022 Island Batik Ambassadors is the “Step-by-Step” Challenge.

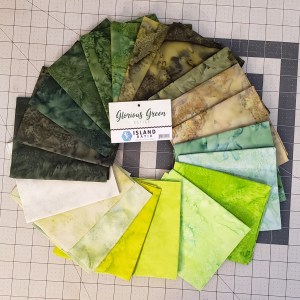
I received the “Glorious Greens” gradation group of 20 fat quarters in my first box from Island Batik. There are 9 other gradation groups of Island Batik colors. Other Ambassadors got different colors, so check out their quilts. The fabrics are available in shops now.
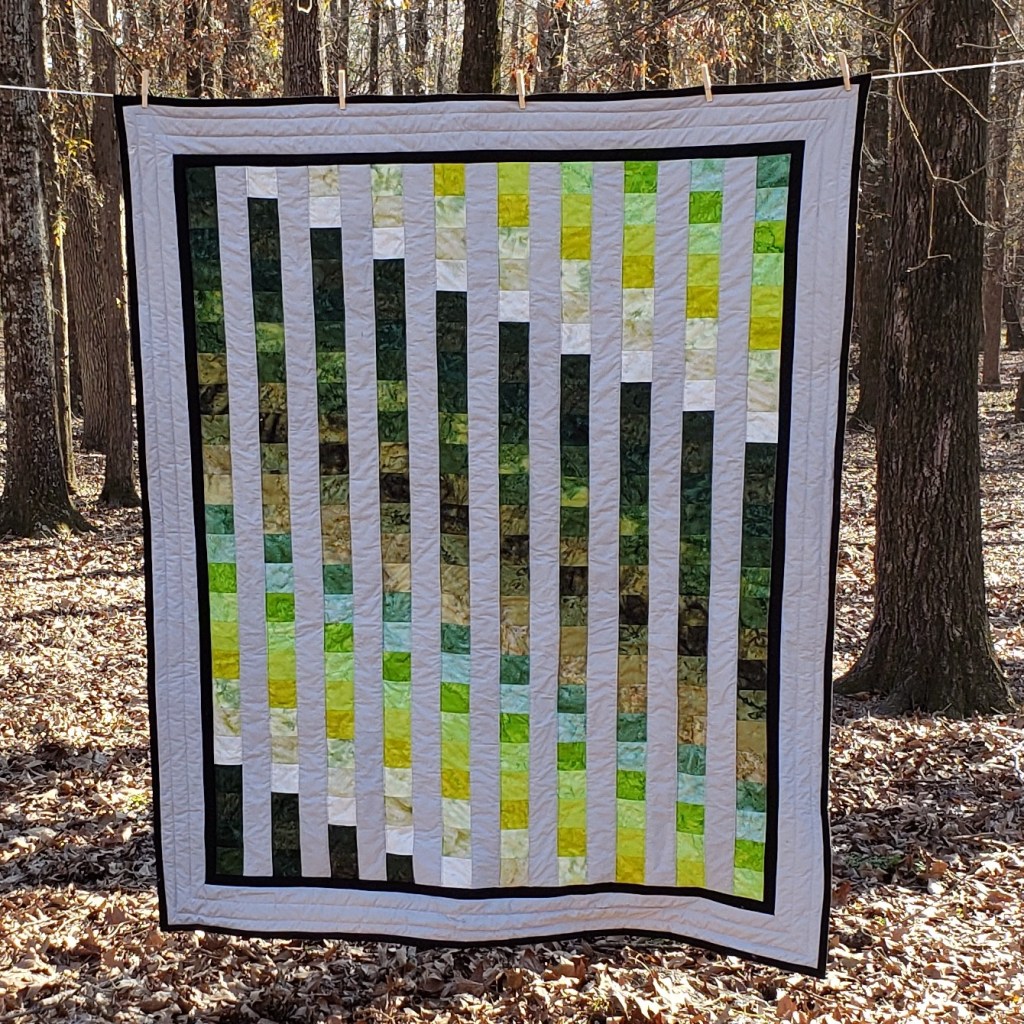
These greens are so pretty, and I normally don’t work with Greens, so I was excited to see what I could create for my first quilt as an Island Batik Ambassador. I have wanted to create a quilt using a Bargello Quilt. I decided to make a variation, and add some strips of gray between the rows.
I cut fourteen 3″ strips x WOF (width of fabric) of gray fabric. Cut 5 in half, and sew a WOF strip and a half piece together, to create a 60″ long piece.
I cut two 3″ strips x 21″ (long side of fat quarter), of each color.

I then placed them down in the gradation order that I wanted to use, from light to dark. I created two sets, making sure the colors were in the same order.

I think pinned the first two rows together, marking the “top” of the strips. I matched every two strips together, as I will sew down all the same direction, from top to bottom.
Note: you will be removing some of the stitches to separate, so if you use a very tiny stitch it may be harder to remove the stitches. Too big of stitches and your pieces may come apart.

After sewing all the strips into sets of two, I pressed the seams towards the dark side. I then attached the sets of strips, together, sewing from the bottom to the top. (I used clips to denote the top of the strips to help with attaching them together, and to help with directional stitching.
When sewing several strips in a row you need to sew down, then up, then down, basically rotating the direction of your sewing. This will help keep the strips straight.
I did two sets of the sets, and then attached the two sets of strips together to make one long piece of 40 strips.

I then took the bottom strip and the top strip and sewed them together, creating a circle of fabric.

I then cut the circle of fabric into 3″ strips, creating 7 circle-strips of fabric.

I decided that my first row would start with the darkest color and get light as it goes down, so I separated my first strip between the darkest and the lightest fabric, creating a long strip.


I sewed a strip of gray to the right side, and pressed towards the gray. I separated the pieces at the bottom of the greens to match the length of the gray strip. I set these pieces aside, as I would need to use later.

I then looked at the next strip, and moved the green’s down one row, separating the pieces between the lightest green, and the next lightest.

I then sewed the rows together, alternating with a gray strip.

I continued to alternate between the greens and the gray strip until I got the width I wanted. After I used the 7 strips, I did need to combine some of the partial strips together to create the last 2 rows.
Alternatively you could cut another strip of each color and create more strips of the colors, and make the quilt longer and wider.
I then added a 1 1/2″ strip of black fabric around the rows, and a 4″ gray border.

I used the Hobbs Heirloom Premium Wool Batting that they sent me, as I wanted a light, but warm quilt, as the person I have in mind for this quilt will be going thru chemotherapy and I wanted something light to carry, but that will keep them warm during the treatment.

I used my domestic #Juki sewing machine to do simple straight line quilting stitches on the quilt. I used some Island Batik Black for the back, and did self-binding with the back fabric. I trimmed the back fabric 2″ wider than the quilt top after quilting, and cut the batting just a little smaller than the backing, and left, to create a more puffy binding.
I used Aurifil 50-wt thread to piece the top and to quilt.

I love how this quilt turned out, and look forward to making more quilts with Island Batik fabric, Aurifil thread and Hobbs Batting.
Thank you to Island Batik, Hobbs Batting and Aurifil Thread for providing me with the materials to make this quilt.
If you enjoyed my Glorious Greens, Step-by-Step quilt, Check out the Step-By-Step challenge projects from my fellow Island Batik Ambassadors for more inspiration!
Brenda Alburl ~ Songbird Designs
Megan Best ~ Bestquilter
Pamela Boatright ~ Pamelaquilts
Elizabeth DeCroos ~ Epida Studio
Jennifer Fulton ~ Inquiring Quilter
Preeti Harris ~ Sew Preeti Quilts
Mania Hatziioannidi ~ Mania for quilts
Jane Hauprich ~ Stitch By Stitch Custom Quilting
Reed Johnson ~ Blue Bear Quilts
Connie Kauffman ~ Kauffman Designs
Emily Leachman ~ The Darling Dogwood
Denise Looney ~ For The Love Of Geese
Leah Malasky ~ Quilted Delights
Maryellen McAuliffe ~ Mary Mack Made Mine
Anorina Morris – sameliasmum.com
Lisa Pickering ~ Lisa’s Quilting Passion
Claudia Porter ~ Create with Claudia
Gail Renna ~ Quilt Haven Threads
Brianna Roberts ~ Sew Cute And Quirky
Michelle Roberts ~ Creative Blonde
Gail Sheppard ~ Quilting Gail
Andi Stanfield ~ True Blue Quilts
Sandra Starley ~ Textile Time Travels
Jennifer Thomas ~ Curlicue Creations
Suzy Webster ~ Websterquilt
#islandbatikambassador #islandbatik #iloveislandbatik #hobbsbatting #aurifil #aurifilthread #juki

Lovely!!! It looks great and the black really makes the colours pop!!! You are brave to do self-binding!!! I always cut the back when I’m trimming! Groan! But yours looks great!
LikeLike
It’s lovely! I love the addition of the gray in between rows. It looks like like looking out a window at a forest to me!
LikeLike
Beautiful quilt, Lisa! It looks like a garden gate to me. Have a lovely day!
LikeLike
Love your greens, Lisa! Great job!
LikeLike