Fabric
Background
12 – 2″ x 2″ squares
5 – 3 1/2″ x 3 1/2″ squares
4 – 2 3/4″ x 2 3/4″ squares
Chain pieces
(To get pattern to assemble without a “y” seam, One of the colors will need to be cut a little different).
3 different fabric patterns
1 – 2″ x 2″ square
1 – 3 1/2″ x 2″
1 – 5″ x 2″
1 – 2 3/4″ x 2 3/4″ square
1 different fabric pattern
2 – 2″ x 2″ square
2 – 3 1/2″ x 2″
1 – 2 3/4″ x 2 3/4″ square
Sewing
HST (Half Square triangles)
Take the 8 pieces 2 3/4″ x 2″3/4 to make 8 HST. (4 background and 1 of each of the different fabric patterns)
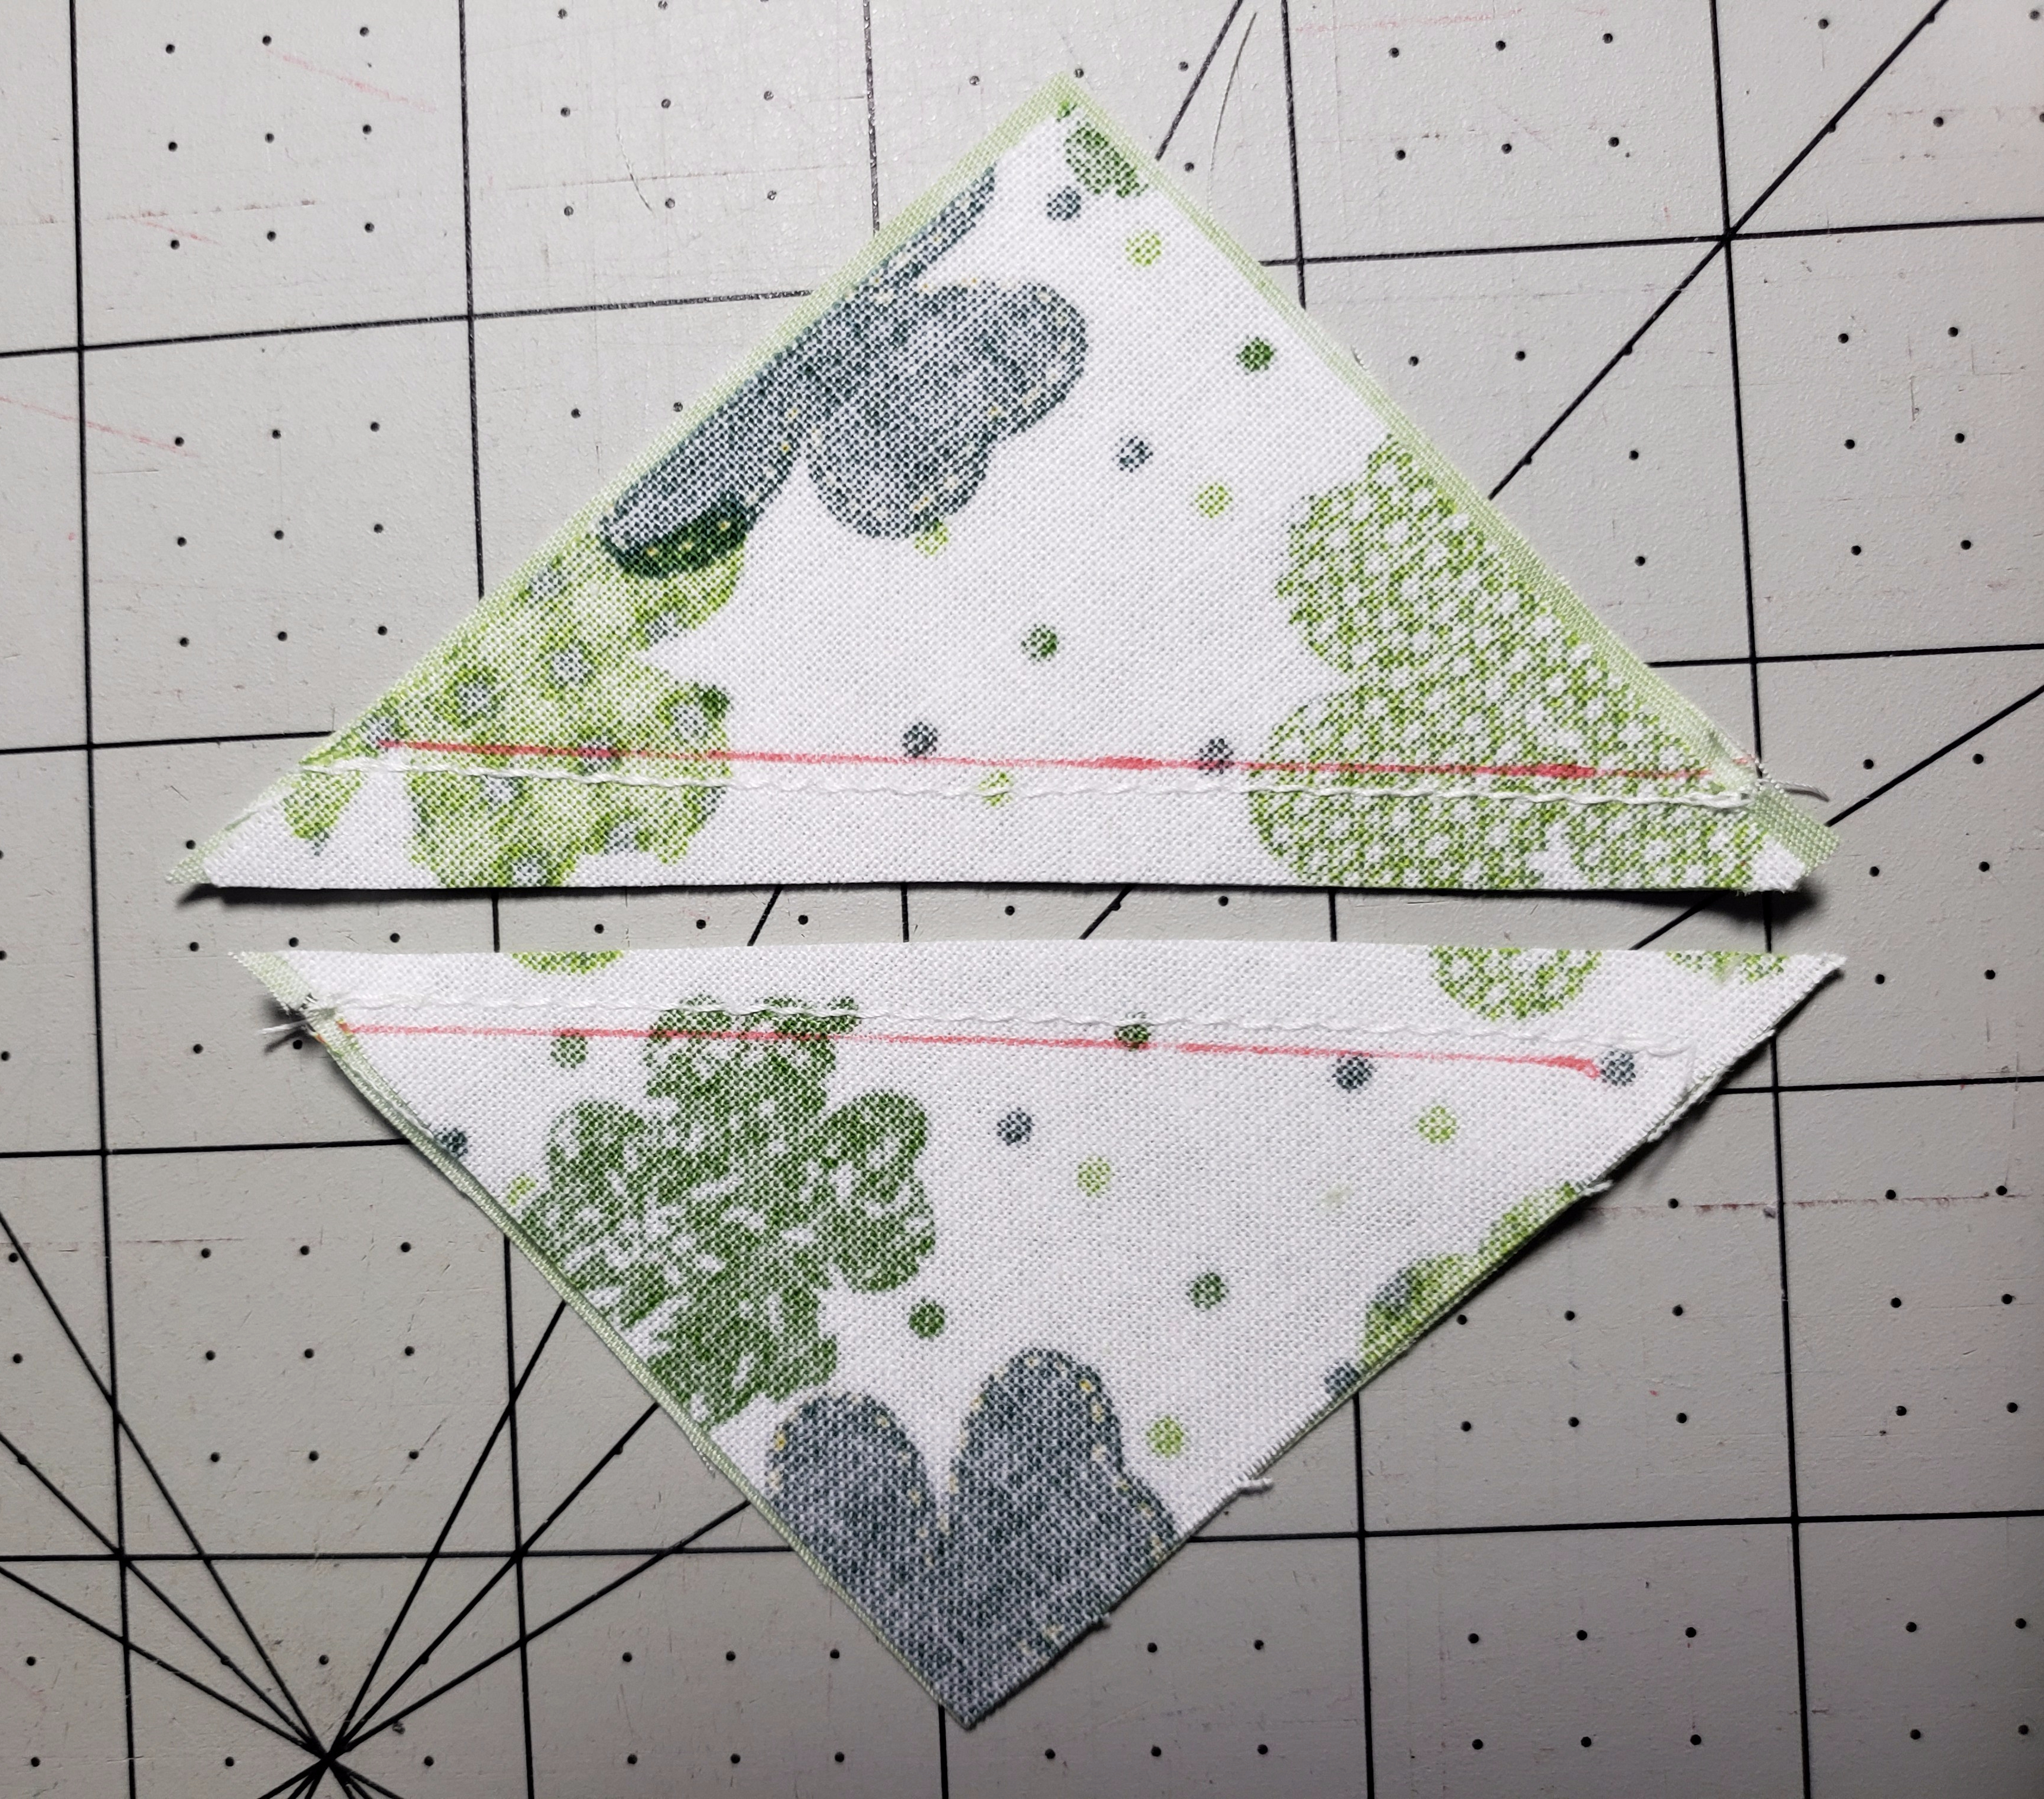
Put one background piece with one of the chain pieces. Front sides together.
Draw a line down the center and stitch 1/4″ on each side.
Repeat for all 4 pieces of the chain with background.
Cut between the two stitch lines.
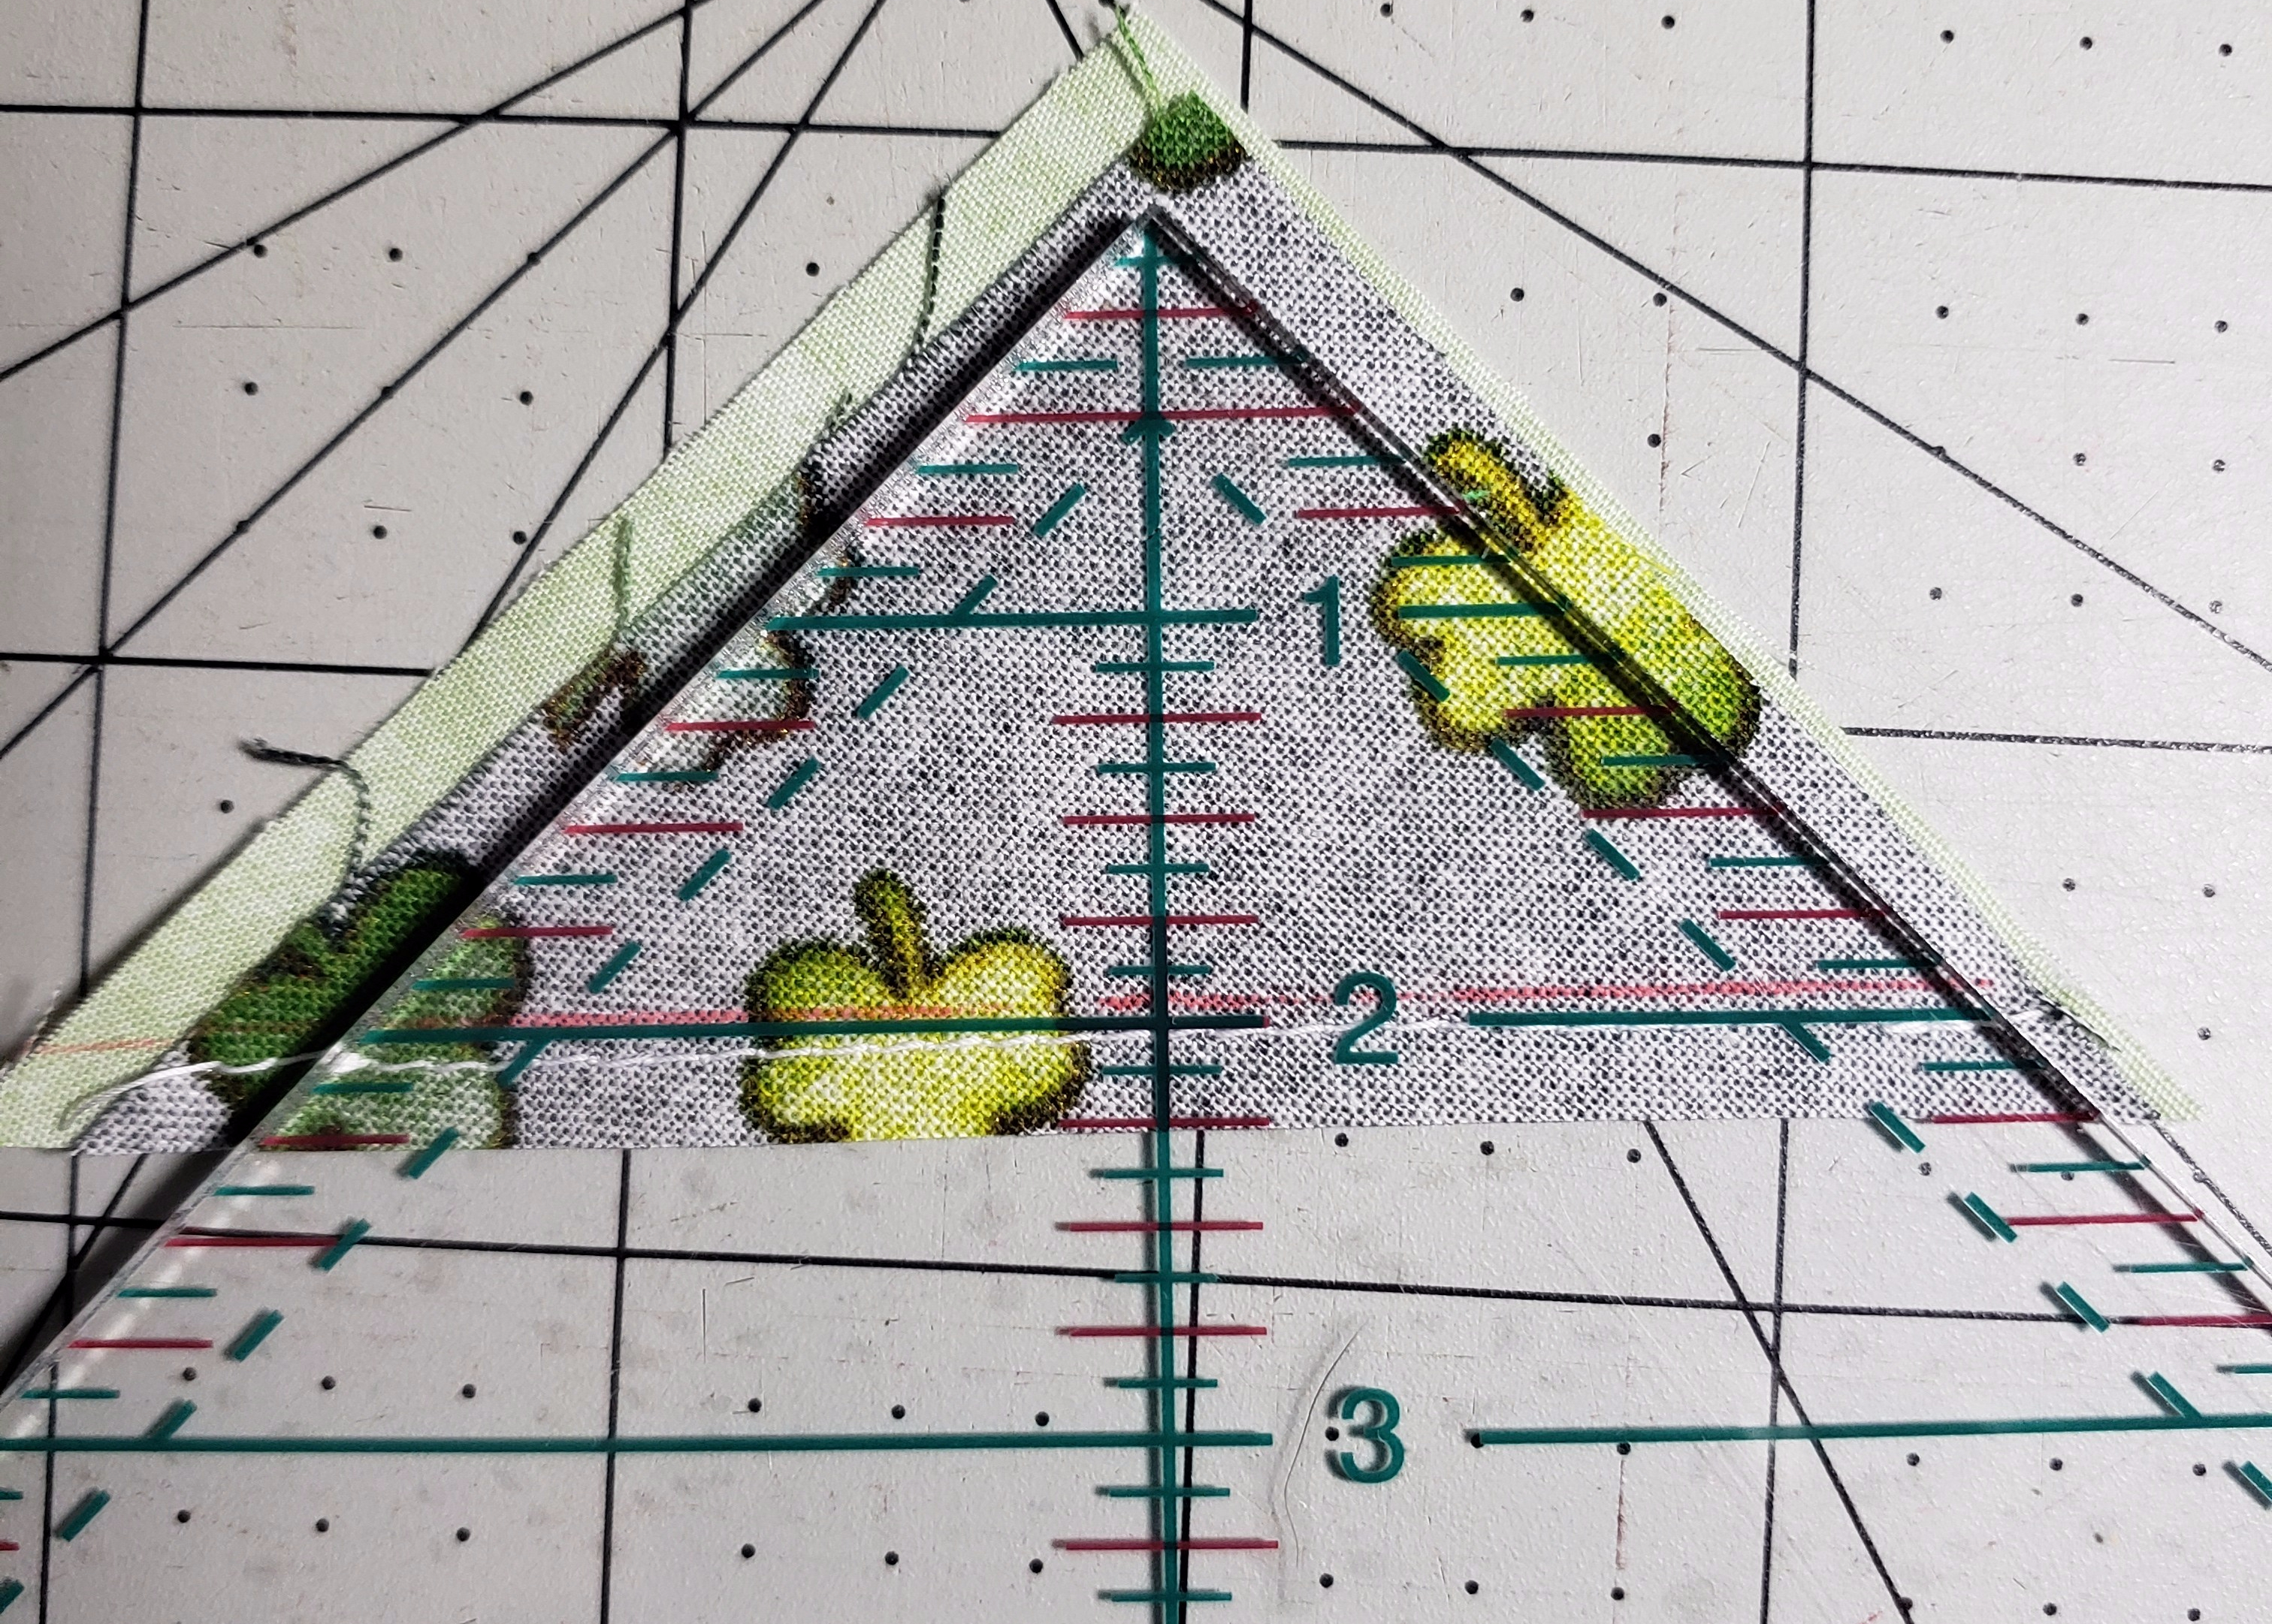
Square-up the HST to measure 2″ HST. (the pieces are cut a little large to make it easier to square up).
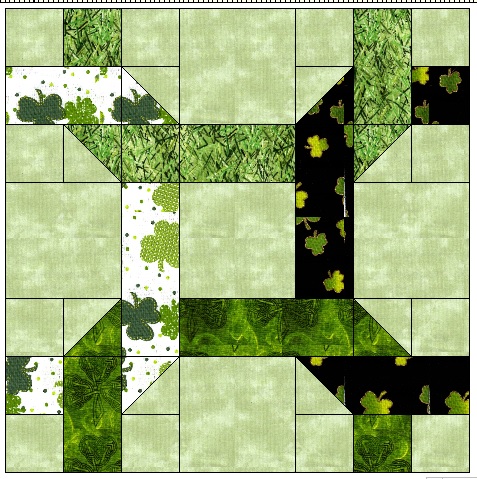
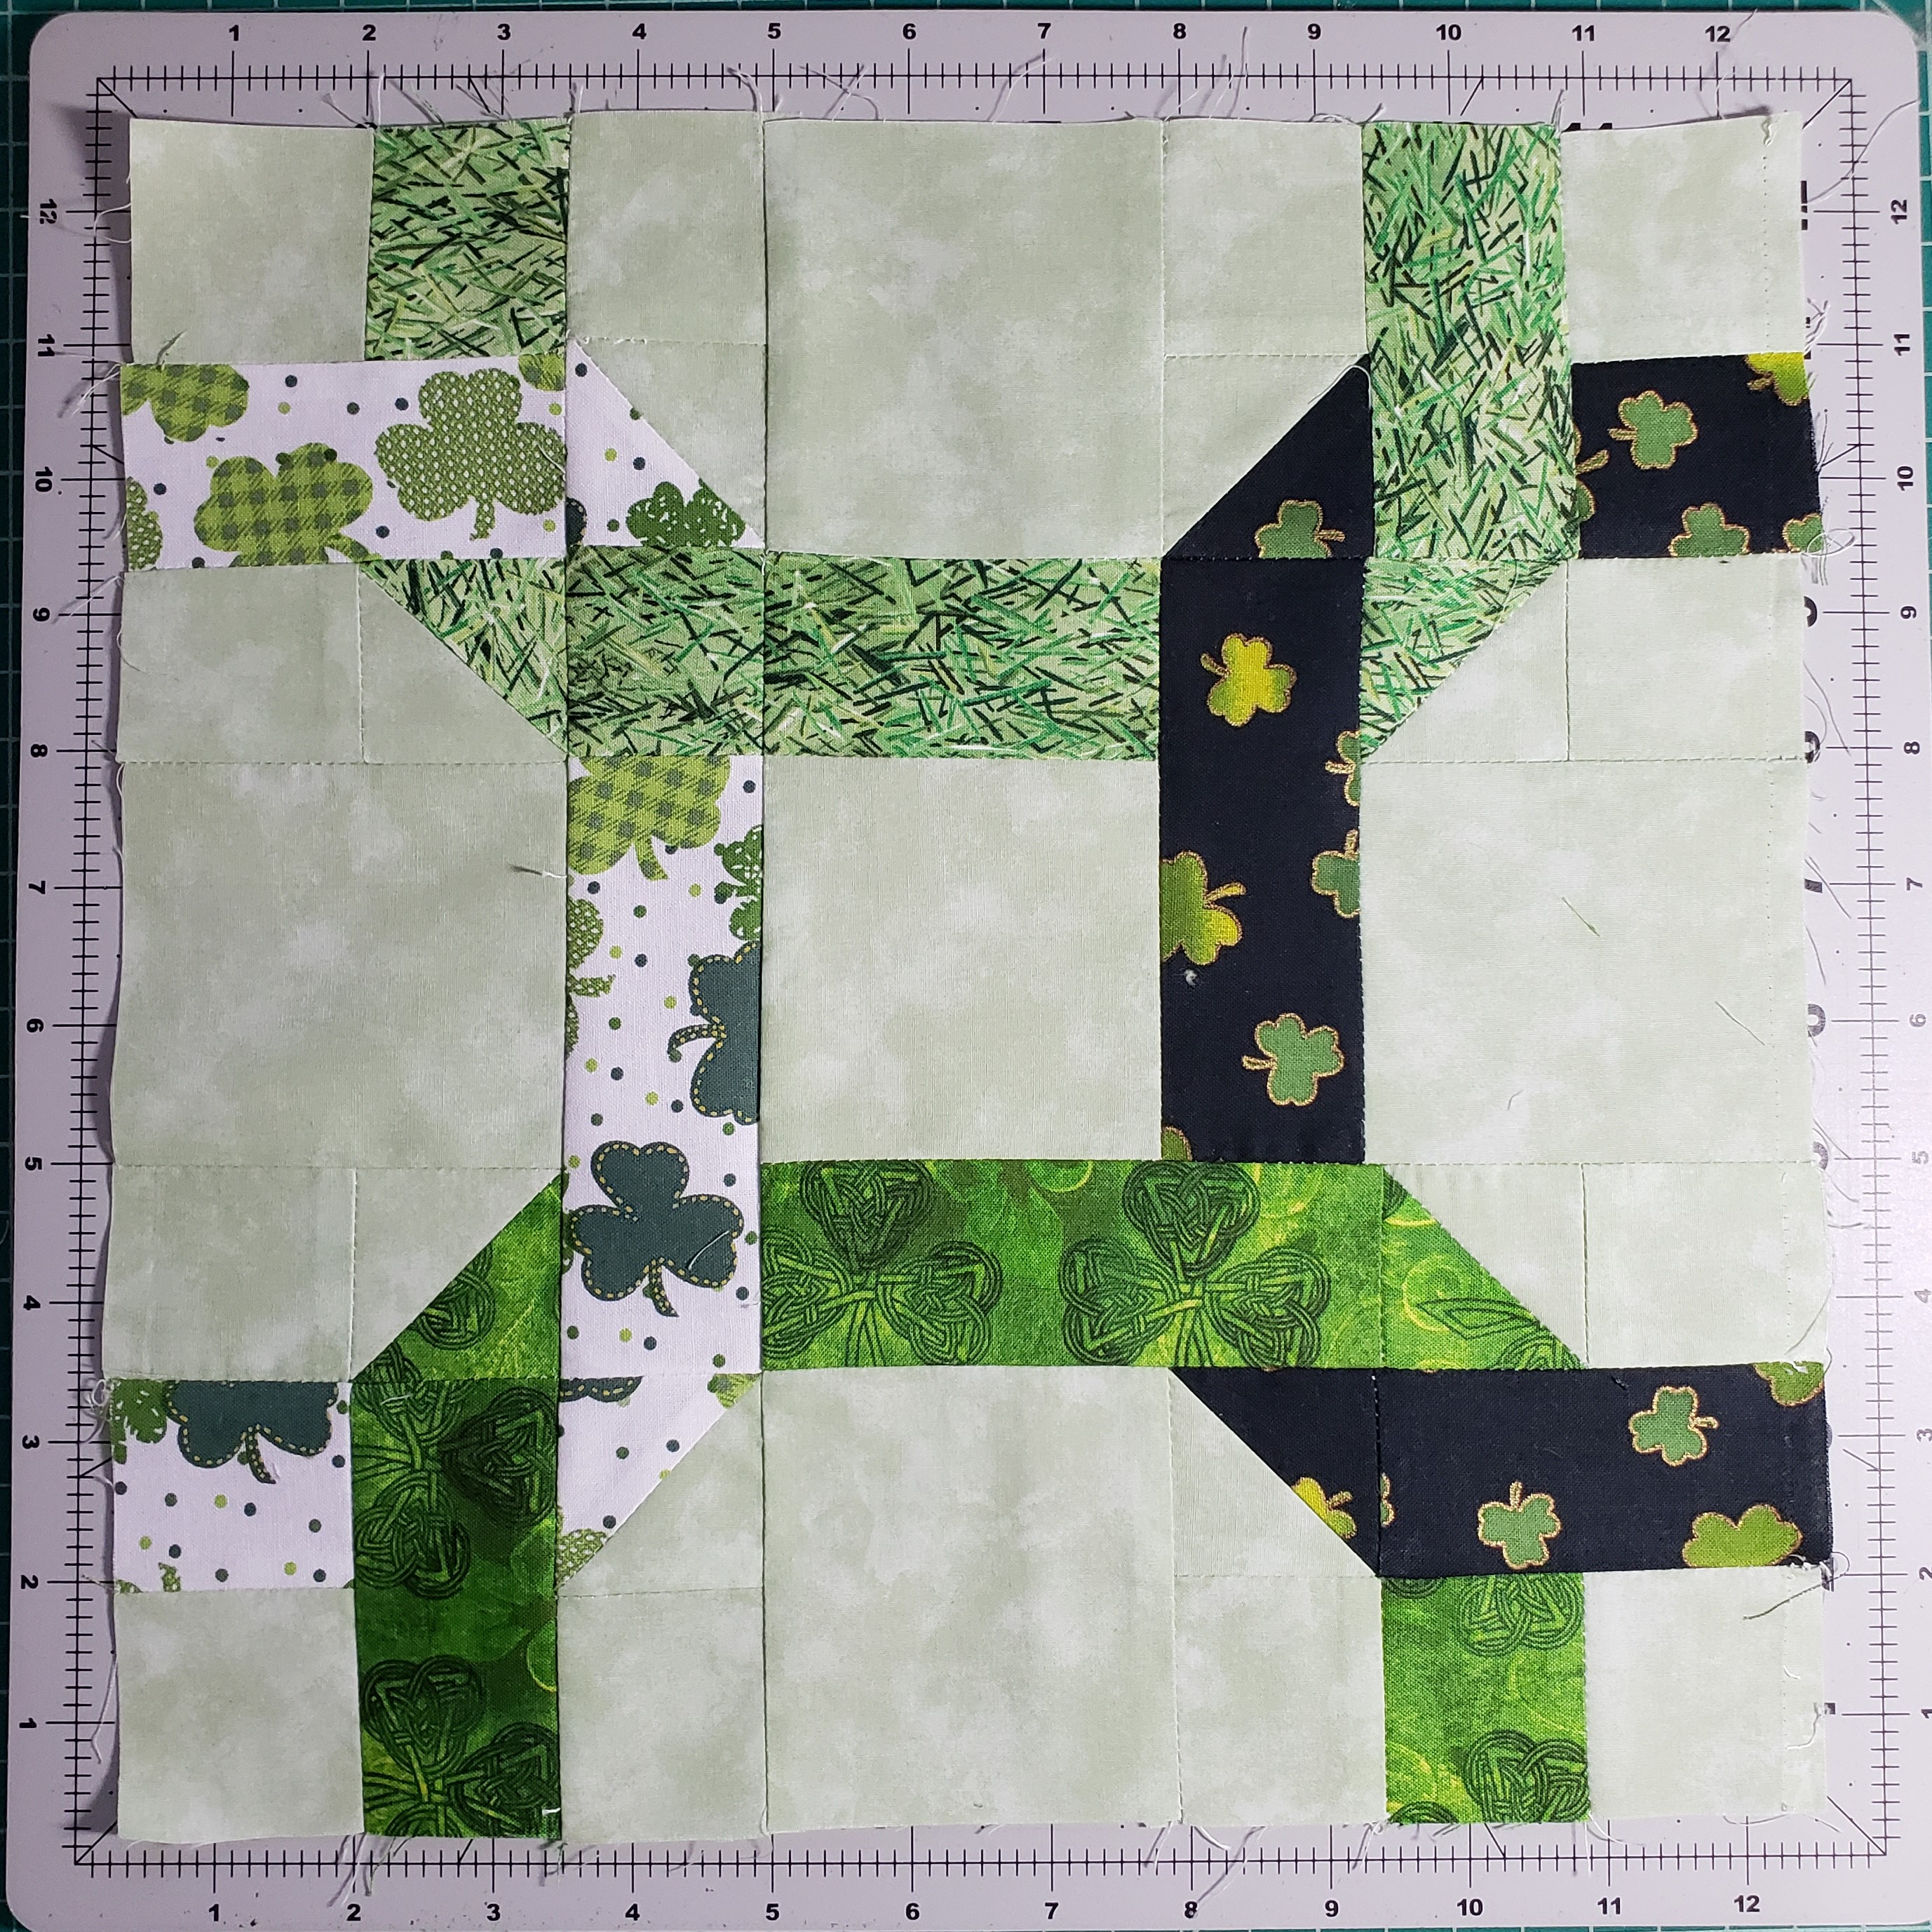
Layout
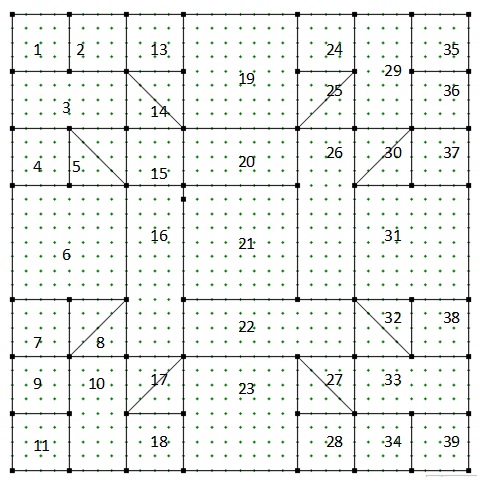
Lay out the pieces according to the pattern, making sure that you watch the placement.
You don’t want to end up like I did, and having to spend time with Mr. Ripper (AKA seam ripper).
Note that the chain that is different are blocks 2, 5, 15, 20, 29, and 30. The top chain of the block. This will help with the layout and sewing of the blocks. You can rotate the block to the direction you like after finishing sewing.
Assembling block
Sewing the block needs to be done in stages to get together without any “y” seams or a visit from Mr. Ripper.
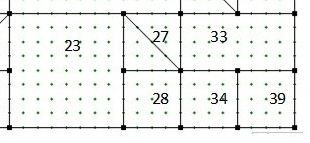
Row 1
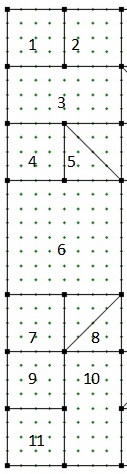
1 to 2
4 to 5
7 to 8
9 to 11
Press then
1/2 to 3
3 to 4/5
6 to 7/8
9/11 to 10
7/8 to 9/10/11

Row 2
13 to 14 to 15 to 16 to 17 to 18
Attach Row 1 to Row 2
Making sure to match block 2 to 13
and 10 to 18
Double check the side you are attaching together.
Row 3 – Row 3 will be sewn in sections A-D
Row 3 – Section A
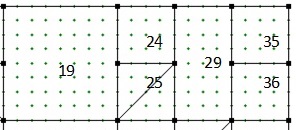
Sew 24 to 25 & 35 to 36
Press then sew
19 to 24/25
29 to 35/36
19/24/25 to 29/35/36
Row 3 – Section B
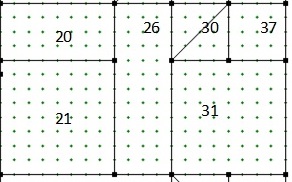
Sew 20 to 21 & 30 to 37
Press then sew
20/21 to 26
30/37 to 31
Sew 20/21/26 to 30/37/31
Row 3 – Section C
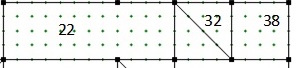
Sew 22 to 32 to 38
Row 3 – Section D
Sew 27 to 28 & 34 to 39
23 to 27/28
33 to 34/39
Press then sew
23/27/28 to 33/34/39
Assembling Row 3
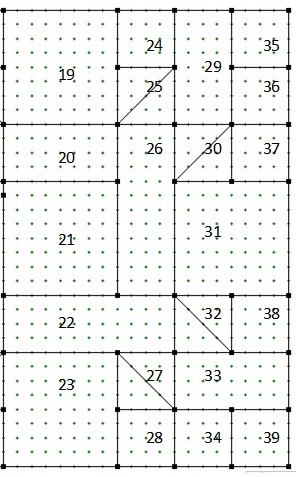
Sew
Section A to Section B
Section C to Section D
Section A/B to Section C/D
Final assembly of block
Attach Row 3 to Rows 1 & 2 making sure to match the design by attaching block 13 to block 19 & Block 18 to block 23.
Attach Row 3 to Rows 1 & 2 making sure to match the design by attaching block 13 to block 19 & Block 18 to block 23.
Your block is now assembled, and ready to post on the Quilting BOM FaceBook group.
Thank you for joining us in this Season Block of the Month!
Click here for a downloadable PDF of the instructions.
See You next month for the April Block!

bombear en el gabinete de suministros de mi empresa me enseno como ser un padre que trabaja
LikeLike
como los abogados deben usar el correo electronico para comunicarse con los clientes creo
LikeLike
Hi, this is Jenny. I am sending you my intimate photos as I promised. https://tinyurl.com/2gjldomr
LikeLike
a hundred thousand thanks (in Gaelic- céad míle maith agat ) for the Irish green quilt square.
LikeLike
I am glad you like it. Upload pictures when you are done
LikeLike
I love that this is not a traditional shamrock block for March. Can’t wait to begin this one!
LikeLike